Code documents in the Conditional Coding pane
When you code documents in the Conditional Coding pane, you can quickly determine which fields you should code depending on the values that you provide for related fields. After you code each field, the colors of the remaining fields change to indicate which fields you still need to code. If you code a value that is unexpected based on the other values that you have coded, a warning message appears.
For example, say that a review phase includes fields for privilege status and privilege type. When you code the privilege status field with the value of privileged, your review lead also wants you to code the privilege type, such as attorney-client. In the Conditional Coding pane, the coding appears incomplete until you code both values. In the same example, if you code the privilege status field with the value of not privileged, but code the privilege type field with the value of attorney-client, a warning message appears.
You can code a single document or mass code documents.
After you code each field, the colors of the fields change to indicate which fields you still need to code, as follows:
Fields that are coded appear in green.
Fields that you should code appear in white. An asterisk indicates that a value is mandatory.
Fields that your case administrator does not expect you to code appear in gray.
Fields that have an unexpected value based on related coding values appear in yellow, and a warning message appears.
The following figure shows an example of the Conditional Coding pane.

To speed up the coding process, you can create and apply coding macros. Coding macros allow you to code a predefined set of values to a document by clicking a single button. Coding macros appear as buttons in a toolbar at the bottom of the Conditional Coding pane.
You can code documents in the Conditional Coding pane if your administrator or review lead creates conditional coding templates for a case or review phase.
Note: Your administrator must enable this feature for your case. The permissions set by your administrator determine access to this feature.
Note: In recent releases, we added coding fields to the Conditional Coding pane that previously were available in only the Code pane. Your administrator can add these fields to a conditional coding template. For more information, see Newly available coding fields.
Customize the layout and zoom
You can customize the layout of coding field names and values in the Single coding and Mass coding views. You can also change the zoom level to increase or decrease the display size of the content in the Single coding and Mass coding views. A smaller zoom level can be useful for showing more information on the screen.
To customize the layout in the Conditional Coding pane:
In the Conditional Coding pane, from the Conditional Coding pane menu, select Options.
In the Options dialog box, under Layout, select one of the following options:
Auto: With this option, which is selected by default, the application automatically adjusts the layout (top and bottom or left and right) of the coding field names and values, depending on the width of the pane.
Top and bottom: The application always displays the coding field values underneath the coding field name.
Left and right: The application always displays the coding field name on the left side of the pane and the coding field values on the right side of the pane.
Click OK.
To change the zoom level:
In the Conditional Coding pane, from the Conditional Coding pane menu, select Options.
In the Options dialog box, under Zoom (%), adjust the percentage. The default setting is 100. The zoom percentage range is 75-150.
Click OK.
Code documents in the Conditional Coding pane
To code one or more documents in the Conditional Coding pane:
Select the document or documents that you want to code.
In the Conditional Coding pane, do one of the following:
To code a single document, on the toolbar, click the Single coding button.
To code multiple documents with the same coding, on the toolbar, click the Mass coding button.
In the Conditional Coding pane, in the list on the toolbar, select a conditional coding template created by your administrator, or select the Active Quick Code, All Values, Binders, Issues, or Production - Unlocked template.
To edit the value of a coding field, click a value.
The colors of the fields change to indicate which fields you still need to code, based on the value that you just coded.
To code additional values to a field, click the Add value button (plus sign) next to a coding field, and then enter a value. You can code multiple values to fields that have a plus sign.
To add the document to a binder, do the following:
Click the Add value button (plus sign) next to the binders field.
Select the check box next to each binder that you want to add the document to.
Click Save.
To add the document to an issue, do the following:
Click the Add value button (plus sign) next to the issues field.
To expand the issue tree, click the plus sign next to an issue.
Select the check box next to each issue that you want to add the document to.
Click Save.
Repeat the previous steps to code the remaining values.
Tip: To undo a recent coding change, click the Undo button next to a field.
When you are finished coding the document, click Next in the Conditional Coding pane to navigate to the next document.
Note: The Next button appears when the conditional coding template contains at least one required field, and all required fields for the relevant conditions are coded.
Code a document with a predefined set of values: coding macros
To speed up and automate repetitive coding tasks, you can code documents with coding macros. A coding macro is a saved set of values that you frequently want to code documents with. Instead of coding a document with each value separately, you can click a macro button once to code the document with all of the values that the macro contains.
Create coding macros
You can save a predefined set of values as a coding macro.
Note: Coding macros do not support the Issues field type.
Coding macros are available to the user who creates the macros.
Tip: Case administrators can share coding macros with the members of a user group. To do this, administrators create macros, and then save their workspace as a group default. For steps to set a default group workspace, see Set a group workspace.
To create coding macros:
Select the document that you want to code.
In the Conditional Coding pane, in the list on the toolbar, select a conditional coding template created by your administrator, or select the Active Quick Code, All Values, Binders, Issues, or Production - Unlocked template.
Code the document with the values that you want the macro to include.
Click the + (plus sign) button in the macro toolbar.
In the Add coding macro dialog box, do the following:
Select an Icon to represent the macro.
Optionally, to remove a field from the macro, hover over a field and then click the X.
Click Save.
Repeat the previous steps to create additional macros, as required.
To reorder the macros, click the Edit coding macros button in the macro toolbar, and then drag the macros to the order that you want. When you are finished, click the Edit coding macros button again.
Code documents using coding macros
You can code a document to a predefined set of values using a coding macro.
You can also code a document with the same values as the previous document using a coding macro.
To code a document using a coding macro:
Select the document that you want to code.
In the Conditional Coding pane, in the list on the toolbar, select a conditional coding template created by your administrator, or select the Active Quick Code, All Values, Binders, Issues, or Production - Unlocked template.
The available macros appear at the bottom of the pane. To see the values that a macro codes, hover over a Macro button.
To code a document using a macro, click the Macro button.
Tip: To speed up the document coding process, you can use keyboard shortcuts instead of the mouse. For information about the available keyboard shortcuts, see Conditional coding keyboard shortcuts.
When you are finished coding the document, click Next in the Conditional Coding pane to navigate to the next document.
Note: The Next button appears when the conditional coding template contains at least one required field, and all required fields are coded.
Remove coding from a document in the Conditional Coding pane
To remove coding values from a document in the Conditional Coding pane:
Select the document that you want to remove coding from.
In the Conditional Coding pane, in the list on the toolbar, select a conditional coding template created by your administrator, or select the Active Quick Code, All Values, Binders, Issues, or Production - Unlocked template.
To clear the value from a field, click the Not Coded option for the field.
To remove the document from a binder, do the following:
Click the Add value button (plus sign) next to the binders field.
Clear the check box next to each binder that you want to remove the document from.
Click Save.
To remove the document from an issue, click the Remove value button (X) next to the issue name.
Add, remove, update, or find and replace mass code fields for documents
The mass code field functionality in the Conditional Coding pane includes advanced features that you can use to add, remove, update, or find and replace mass code fields for one or more documents.
To work with the mass code field functionality:
Note: This functionality is available on both the Single coding and Mass coding tab in the Conditional Coding pane.
To work with the mass code field functionality, do one of the following:
For a single document, select a document, and then, on the toolbar in the Conditional Coding pane, click the Single coding button.
For multiple documents, select documents, and then, on the toolbar in the Conditional Coding pane, click the Mass coding button.
In the Conditional Coding pane, on the toolbar, click the Mass code field button.

Note: You might have to pin this option from the Conditional Coding menu to the toolbar.
The Mass code field dialog box appears.
To add a mass code field:
In the Mass code field dialog box, select a field name.
Under Actions, select Add.
Under New value, add a new value.
Click OK.
To remove a mass code field:
In the Mass code field dialog box, select a field name.
Under Action, select Remove.
Click OK.
To update a mass code field:
In the Mass code field dialog box, select a field name.
Under Action, select Update.
Under New value, provide a new value.
Click OK.
To find and replace a mass code field:
In the Mass code field dialog box, select a field name.
Under Action, select Find and replace.
Under Current value, select Has a value or A specific value, and then provide a value.
Click OK.
Mass code fields in the current template on the Mass coding tab
To mass code fields in the template that is currently in view on the Mass coding tab in the Conditional Coding pane:
In the Conditional Coding pane, on the toolbar, click the Mass coding button.
On the Mass coding tab, in the list on the toolbar, select a template.
Select one or more documents, for example, in the List pane.
Click the Mass code field button for a field in the template.
Important: Applying the changes will override the current values. This action cannot be undone.

Note: When you mass code documents, the changes sync across other panes.
Add a shared or private binder in the Conditional Coding pane
Group leaders with permissions to work with binders can add a shared or private binder and apply security to that binder in the Conditional Coding pane.
Add a shared binder in the Conditional Coding pane
To add a shared binder:
In the Conditional Coding pane, in the list on the toolbar, select the Binders template.
On the toolbar, click Add binder.
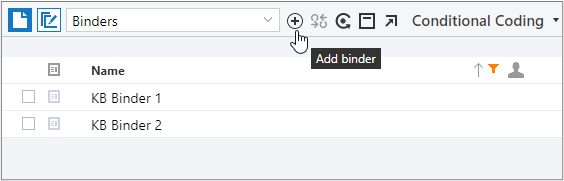
In the Add binder window, on the Properties page, do the following:
In the Name box, provide a name.
Optionally, in the Description box, provide a description.
Under Type, leave the Shared binder type option selected.
Note: For information about how to add a private binder, see Add a new private binder.
Optionally, under Use as, select one or both of the following options:
Security override: Security overrides enable users to override existing permission settings for binders. When you select this check box, a key icon appears on the left of the binder Name on the Case Setup > Binders page.
Mobile: For information about creating mobile binders, see Work with mobile binders.
Click Next.
The Security page appears.
On the Security page, to change the security for a user group, select one or more of the options described in the following table.
|
Permission |
Description |
|
Deny
|
Denies the group access to the binder. |
|
Allow
|
Allows read access to the binder. |
|
Add
|
Allows the group to add documents to the binder. |
|
Delete
|
Allows the group to delete documents from the binder. |


Click Save.
Add a new private binder in the Conditional Coding pane
To add a new private binder:
On the Case Home page, under Case Setup, click Binders.
On the toolbar, click Add.
In the Add binder window, on the Properties page, do the following:
In the Name box, provide a name.
Optionally, in the Description box, provide a description.
Under Type, select Private.
The Owner list appears.
In the Owner list, select an owner.
Note: The owner can be you or someone else. The contents of the binder are available only to their owner. The owner can view, edit, or delete private binder, and can convert a private binder back into a shared binder.
Click Save.
Note: If you are a group leader with permissions and need to delete a binder, you can do that on the Case Setup > Binders page, but not in the Conditional Coding pane. For more information, see Delete a binder.
Add or delete items in the Issues and Binders templates
To add issues or binders to documents, or delete issues or binders from documents:
In the Conditional Coding pane, on the toolbar, click the Mass coding button.
In the list on the toolbar, select the Issues or Binders template.
Do one of the following:
To add an issue or binder, click the checkmark next to an issue or binder.
To delete an issue or binder from a document, click the X next to an issue or binder.
Note: When you mass code documents, the changes sync across other panes.
Link from the Issues and Binders templates in the Conditional Coding pane to the Case Setup > Issues and Binders pages
When you open an active Issues or Binders template in the Conditional Coding pane, you can access the Issues or Binders pages in the Case Setup section and manage issues or binders.
Note: Your administrator must grant permissions for you to access the Case Setup > Issues or Binders pages.
To access the Case Setup > Issues or Binders pages from the Conditional Coding pane:
In the Conditional Coding pane, in the list on the toolbar, select the Issues or Binders template.
On the Conditional Coding menu on the toolbar, select the Manage button.
Tip: If you plan to use this feature frequently, pin this menu option to the toolbar.
The application directs you to the Issues or Binders page in the Case Setup section.
Add an issue in the Conditional Coding pane
Reviewers with permissions to manage issues can create a new issue for coding by adding the issue in the Conditional Coding pane
Note: Your case role and group permissions determine your access to the Add issue functionality. Case administrators and group leaders with Leaders permissions set to Allow on the Case Setup - Issues > Properties page can access this functionality; group members cannot.
To add an issue in the Conditional Coding pane:
In the Conditional Coding pane, in the list on the toolbar, select the Issues template.
On the Conditional Coding menu, on the toolbar, select the the Add Issue plus sign.
In the Add issue dialog box, enter a name in the Name box.
Select a parent issue in the list.
Click Save.
Tip: If you plan to use this feature frequently, pin this menu option to the toolbar.
Create links from a memo field
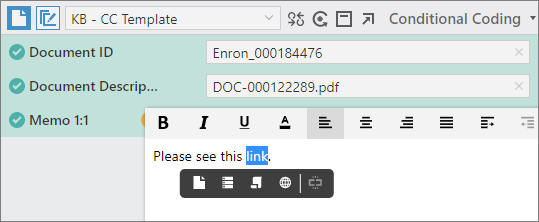
If your Conditional Coding template includes a user-created memo field, in addition to adding a memo, you can also add hyperlinks to the text in the memo.
To create hyperlinks in a memo field using the inline menu feature:
In the Conditional Coding pane, locate the memo field.
In a memo field, for example, Memo 1:1, enter new, or edit existing, link text.
Double-click or highlight the link text.
The inline menu appears.
To link to a document:
Click the Document link button.
The Link document dialog box appears.
Perform a search to locate the document to link to.
Select the document, and then click Save.
To link to an object:
Click the Object link button.
The Link object dialog box appears.
Click Type to select a file type.
Select an object, and then click OK.
To link to a transcript:
Click the Transcript link button.
The Link transcript dialog box appears.
Select a transcript.
To link to a specific page of the transcript, click Page, and then select a page from the list.
Click OK.
To link to a website:
Click the Web link button.
A blank box appears with a grey https:// URL example.
Enter a website URL beginning with http:// or https://.
Press Enter.
To remove an inline menu link:
Highlight the linked text.
Click the Remove link button.
Newly available coding fields
In recent releases, we added the following coding fields to the Conditional Coding pane. These coding fields were previously available in only the Code pane. Your administrator can add these fields to a conditional coding template.

Binders - Custom: If your administrator added a Binders - Custom coding field to a conditional coding template, you can now code documents to the binders included in this field.
Issues - Custom: If your administrator added an Issues - Custom coding field to a conditional coding template, you can now code documents to the issues included in this field.
Source/Attachments: If your administrator added a Source/Attachments coding field to a conditional coding template, you can use this coding field to see where a document is positioned within the tree of its related source and attachment documents. The current active document appears in black type, and the related Document IDs are links that you can click to open each document in a standalone window. The icon and tooltip to the left of the document ID indicate the document type, and the icon color represents the coded values of the quick code field (if configured).
Note: The Source/Attachments coding field also appears in the System Fields section of the All Values template.