Work with issues
Issues provide a way to organize documents by associating them to case facts, events, matters, topics, or subjects relevant to a case, as defined by the administrator or group leader. Use the Issues page to create and structure the issues of a case in a hierarchy and to organize documents by issues. Only an administrator or group leader with administrative permissions can configure issues for a case.
You can create the following types of issues:
Root issues: Also known as top-level or parent issues. You can set group permissions for root issues only.
Child issues: Child issues inherit permissions from their root issues. You can also create subissues of child issues.
Depending on your user category, group access, or content access, you can perform the following tasks:
View a root issue and its child issues.
View documents coded to issues.
Create root issues, child issues, and subissues.
Clone a root issue and its child issues.
Import issues.
Set security for a root issue.
Grant administrative access to group leaders to issues.
Move any root, child, or subissues to a different root, child, or subissue.
Download an issue report.
Export issues.
Edit the properties of an issue.
Delete an issue.
View root and child issues
When you first open the Issues page, the application displays all top-level root issues as well as their total number of child issues. Click a root issue to display its child issues in a tree hierarchy, and to expand and collapse the nodes to view the issues.
To view issues:
On the Case Home page, under Case Setup, click Issues.
On the Issues page, the root issues appear. This page includes the following columns:
Name: The name of the root issue.
Documents: The number of documents coded to the root issue.
Child issues: The number of child issues.
Child issues documents: The number of documents coded to a root issue or any of its child issues.
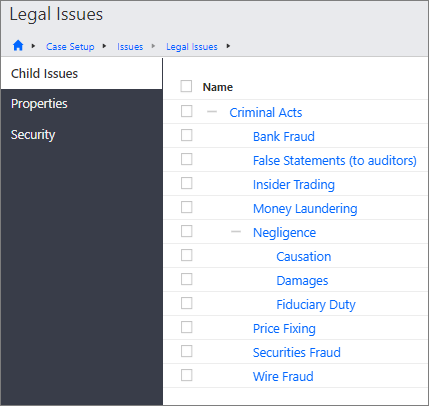
To view child issues, in the Name column, click the link for a root issue.
On the Child Issues page, to select a child issue and its subissues, select the check box next to a child issue.
To select all child issues and subissues, select the check box next to the Name column label.
To collapse or expand rows on the Child Issues page, click the plus or minus signs to the left of the issue name.
Note: As you select issues to view, a breadcrumb trail appears below the navigation bar. Use the breadcrumb trail to track your position on the Issues page.
View documents coded to issues
To view the documents coded to issues:
On the Case Home page, under Case Setup, click Issues.
On the Issues page, the following columns appear:
Name: The name of the root issue.
Documents: The number of documents coded to the root issue.
Child issues: The number of child issues.
Child issues documents: The number of documents coded to a root issue or any of its child issues.
Note: The document counts do not respect document security, so if your group does not have access to all documents, you may see fewer documents on the Documents page than indicated by the number in the column.
To open the documents coded to issues, select from the following:
To open the documents coded to a root issue, click a number in the Documents column.
To open the documents coded to a root issue or any of its child issues, click a number in the Child issues documents column.
To open the documents coded to a specific child issue, click the name of a root issue. On the Child Issues page, click a number in the Documents column.
Note: If your group does not have the proper permissions to access the root issue, the number is not a link.
The documents open on the Documents page.
Create a root issue with child issues
You can create only a root issue, or you can create a root issue and child issues at the same time.
You can create as many root and child issues as required. A child issue or subissue inherits all permissions from its top-level root. A new child issue adds to the child issues count of the root issue.
To create a root issue with child issues:
On the Case Home page, under Case Setup, click Issues.
On the Issues page, on the toolbar, click Add.
In the Add issues dialog box, do the following:
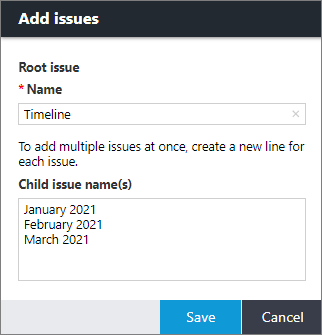
In the Name box, provide a name for the root issue.
(Optional) In the Child issue name(s) box, provide the names of the child issue or issues.
Note: Create a new line for each child issue.
Tip: You can also add child issues later.
Click Save.
The root issue appears on the Issues page. If you added child issues to the root issue, the number of child issues appears in the Child Issues column.
Set the security for the root issue. For more information, see Set group security for issues.
Add additional child issues to a root issue
If you did not include child issues when you created a root issue, you can add additional child issues after you create a root issue.
To add child issues to a root issue:
On the Case Home page, under Case Setup, click Issues.
On the Issues page, in the Name column, click the link for a root issue.
On the Child Issues page, on the toolbar, click Add.
In the Add issues dialog box, in the Child issue name(s) box, provide the names of the child issue or issues.
Note: Create a new line for each child issue.
Click Save.
On the Child Issues page, the child issues appear under the root issue.
Add subissues to child issues
You can also add subissues to child issues.
To add subissues to child issues:
On the Case Home page, under Case Setup, click Issues.
On the Issues page, in the Name column, click the link for a root issue.
On the Child Issues page, hover over the row for a child issue, and then click the Add issue button.
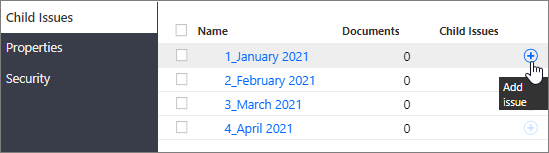
In the Add issues dialog box, in the Child issue name(s) box, provide the names of the child issue or issues.
Note: Create a new line for each child issue.
Click Save.
On the Child Issues page, the subissues appear under the child issue.
Clone a root issue and its child issues
You can clone an existing root or child issue, including its subissues.
Note: When you clone an issue, the application clones only the issue structure, but not the document membership, that is, documents coded to the issues that you cloned.
To clone an existing root issue:
On the Case Home page, under Case Setup, click Issues.
On the Issues page, select a root issue, and then, on the toolbar, click Clone.
In the Clone issue dialog box, in the Issue name box, edit the name of the issue, and then click OK.
The cloned issue appears on the Issues page.
Note: The application clones the security settings as well.
To clone an existing child issue:
On the Case Home page, under Case Setup, click Issues.
On the Issues page, in the Name column, click the link for a root issue.
On the Child Issues page, select a child issue, and then, on the toolbar, click Clone.
In the Clone issue dialog box, in the Issue name box, edit the name of the issue, and then click OK.
The cloned issue or issues appear on the Child Issues page.
Import issues
You can import issues using a .csv file. You can download the template from the application.
To import issues:
On the Case Home page, under Case Setup, click Issues.
On the Issues page, on the toolbar, click Import issues.
In the Import issues dialog box, do one of the following:
If you already have a .csv file with issues, to upload your .csv file, click Browse.
If you do not have a prepared .csv file, click the Download template link to download and populate a .csv file, and then click Browse to upload your file.
Note: In the .csv file, you must separate the root and child issues with commas.
After you upload your .csv file, click OK.
The imported root issue appears on the Issues page.
Note: If the application encounters errors when importing the .csv file, a notification appears. The notification includes a link to the errors. Fix the errors and upload the .csv file again.
Set the security for the root issue. For more information, see Set group security for issues.
Set group security for root issues
You can set group security for root issues. The permissions that you set for a root issue apply to its child issues. You cannot set permissions for child issues.
By default, the security setting for new issues is set to Deny.
To set group security for root issues:
On the Case Home page, under Case Setup, click Issues.
On the Issues page, in the Name column, click the link for a root issue.
In the navigation pane, click Security.
Depending on which groups you want to set security for, do the following:
To change the security for a user group, hover over the row for the group, and then select an option.
To change the security for all user groups, select an option in the heading row. Then click OK.
The following security settings are available.
|
Permission |
Description |
|
Deny
|
Denies the group access to the issue. |
|
Allow
|
Allows the group access to the issue. |
|
Write
|
Allows the group to edit the issue. |

Grant group leaders administrative access to issues
To allow group leaders to manage the properties or security for issues, administrators must grant administrative access to issues. For information about how to grant group leaders administrative access to issues, see Administrative access.
Move child issues to a different root issue
You can move any issue from one root or child issue to another root or child issue, as in the following examples:
Move root issues, including their child and subissues, to another root, child, or subissue.
Move child issues, including their subissues, to another root, child, or subissue.
Move subissues to another root, child, or subissue.
When you move issues, the application maintains the document membership, that is, the documents coded to the issues.
To move root issues, including their child and subissues, to another root, child, or subissue:
On the Case Home page, under Case Setup, click Issues.
On the Issues page, in the Name column, select the check boxes next to one or more root issues.
On the toolbar, click Move.
To move the root issues, including their child and subissues, to a different root issue:
In the Move issues dialog box, under Choose destination, select a root issue, and then click OK.
To move the root issues, including their child and subissues, to a different child or subissue:
In the Move issues dialog box, under Choose destination, click to expand the root issue rows.
Click to expand the child and subissue rows.
Select a child or subissue, and then click OK.
To move child issues, including their subissues, to another root, child, or subissue:
On the Case Home page, under Case Setup, click Issues.
On the Issues page, in the Name column, click the link for a root issue.
On the Child Issues page, in the Name column, select the check boxes next to one or more child issues.
On the toolbar, click Move.
To move the child issues, including its subissues, to a different root issue:
In the Move issues dialog box, under Choose destination, select a root issue, and then click OK.
To move the child issues, including their subissues, to a different child or subissue:
In the Move issues dialog box, under Choose destination, click to expand the root issue rows.
Click to expand the child and subissue rows.
Select a child or subissue, and then click OK.
Note: If a child issue with the same name already exists in the target root issue, the application notifies you and does not move the child issue. Change the name of the child issue and repeat the previous steps.
Download an issues report
You can download data for one or more issues. The application downloads the data to a .csv file, which you can open in Microsoft Excel or a text editor. When you download a root issue, you also download its child issues. You can only download issues for which you have permissions.
To download issues:
On the Case Home page, under Case Setup, click Issues.
On the Issues page, select the check box next to the issues to export.
Note: If you do not select any issues, the application downloads all issues by default.
Click Download report, and then click OK.
Open or save the issue report.
Export issues
You can export issues and associated child issues in a .csv format.
To export issues:
On the Case Home page, under Case Setup, click Issues.
On the Issues page, select the check boxes next to one or more issues.
On the toolbar, click Export issues.
In the Export issues dialog box, to confirm the export to a .csv file, click OK.
The application downloads the .csv file to your computer.
Edit issue properties
You can rename a root or child issue, or describe the issue, if you have proper permissions for that issue as well as administrative access to issues.
To edit properties for root or child issues:
On the Case Home page, under Case Setup, click Issues.
On the Issues page, click the name of the root issue.
In the navigation pane, click Properties.
Change the Name of a root issue or add a Description, and then click Save.
In the navigation pane, click Child Issues.
Click the Name of the child issue.
Change the Name or add a Description, and then click Save.
Delete issues
If you have permissions for a root issue, you can delete the issue and its child issues and subissues. When you delete an issue, the application deletes all coding to the issue and its child issues. This includes coding on documents in a locked production or coding hidden from the user's groups.
Delete root issues
To delete a root issue:
Note: When you delete a root issue, the application also deletes associated child issues and any subissues of the child issues.
Note: Only case administrators can delete issues. When deleting an issue, the application removes the issue and its coding from the system, including from all locked productions.
On the Case Home page, under Case Setup, click Issues.
On the Issues page, select the check box next to a root issue. Selecting a root issue also selects all of its child issues.
On the toolbar, click Delete.
If you are deleting a single issue, if the issue has base documents or renditions coded to it, the Delete issues dialog box displays a red banner below the header bar with the message Documents are coded to this issue. The dialog box also contains a View documents link that shows the number of coded documents, with the number reflecting the combined number of base documents and rendition documents coded to the issue.
If the issue has base documents and/or rendition documents coded and is used as an exception population in any locked or unlocked production, the warning message includes the statement This issue is used for rules in [number] productions. Deleting this issue will remove the related production rules and reroute the documents to the default rule.
If no base or rendition documents are coded to the issue, then there is no red banner.
The message displayed is similar if you are deleting multiple issues and at least one issue has base documents or renditions coded to it.
Click OK.
Delete child issues
To delete a child issue:
Note: When you delete a child issue, the application also deletes associated subissues.
On the Case Home page, under Case Setup, click Issues.
On the Issues page, click the name of a root issue.
On the Child Issues page, select the check box next to one or more child issues.
On the toolbar, click Delete.
If you are deleting a single issue, if the issue has base documents or renditions coded to it, the Delete issues dialog box displays a red banner below the header bar with the message Documents are coded to this issue. The dialog box also contains a View documents link that shows the number of coded documents, with the number reflecting the combined number of base documents and rendition documents coded to the issue.
If the issue has base documents and/or rendition documents coded and is used as an exception population in any locked or unlocked production, the warning message includes the statement This issue is used for rules in [number] productions. Deleting this issue will remove the related production rules and reroute the documents to the default rule.
If no base or rendition documents are coded to the issue, then there is no red banner.
The message displayed is similar if you are deleting multiple issues and at least one issue has base documents or renditions coded to it.
Click OK.