Customize the workspace
The workspace is the arrangement of panes and features on the Documents page. The workspace appears when you open the Documents page after you run a search or browse a document collection.
The name of each workspace indicates the panes that appear in the workspace. The default workspace A displays the Browse pane, List pane, View pane, and Code pane. The panes in additional default workspaces are arranged based on common document review and coding tasks.

To change the workspace configuration, click the arrow below the workspace buttons, and then select a workspace.
You can also change a workspace pane on the fly. For more information, see Change a workspace pane.
To resize a pane in the workspace, drag its border to adjust the height or width. Depending on the width of the pane, the pane name may collapse into a menu. In the View pane, the buttons to select a different view option also collapse into a menu.
You can edit any workspace, or create a custom workspace for a specific coding or review workflow.
If your case administrator has created a custom workspace for your user group, the group workspace appears instead of the default workspace. You can customize the group workspace, or reset it to the group defaults or case defaults at any time. For information about how to reset the workspace, see Reset a workspace. For information about how to set a group workspace, see Set a group workspace.
Pin a workspace to the toolbar
If you frequently use a particular workspace configuration, you can pin the workspace to the toolbar so that it is easy to access the workspace.
For example, you can pin a workspace that includes two View panes to the toolbar, to see two different views of the same document.
To pin a workspace to the toolbar:
On the Documents page toolbar, click the arrow below the workspace buttons.
To unpin one of the default workspaces, click the Unpin button next to the workspace name.
Note: You can pin up to three workspaces, as A, B, and C.
To pin a workspace to the toolbar, click the Pin button next to the workspace name.
Create a workspace
To create a workspace:
On the Documents page toolbar, click the arrow below the workspace buttons.
Click Add new workspace.
The Edit workspace dialog box appears. The gray boxes show a preview of the panes on the workspace.
Type a name for the new workspace.
For each pane, open the menu and select the feature that you want to include in the pane.
To add an additional pane to the workspace, click Add another pane. Then, select a feature to include in the pane. You can include up to five panes in each workspace.
To adjust the arrangement of panes, click a layout button.
When you are finished configuring the workspace, click Save.
Edit a workspace
You can change the panes that are included in a workspace, adjust the layout of panes, or rename a workspace.
To edit a workspace:
On the Documents page toolbar, click the arrow below the workspace buttons.
Select from the following:
To edit the current workspace, click Edit current workspace.
To edit any other workspace, hover over the workspace name and then click the Edit Workspace button.
To change the feature that appears in a pane, select a feature from the menu.
To add an additional pane to the workspace, click Add another pane. Then, select a feature to include in the pane. You can include up to five panes in each workspace.
To remove a pane from the workspace, click the Remove this pane button (X).
To adjust the arrangement of panes, click a layout button.
To rename the workspace, type a name in the box.
Click Save.
Delete a workspace
To delete a workspace:
On the Documents page toolbar, click the arrow below the workspace buttons.
Click the Edit Workspace button.
Note: You cannot delete the active workspace. If you want to delete the active workspace, first switch to a different workspace, and then delete the original workspace.
Click Delete, and then click Yes to confirm.
Reset a workspace
You can reset a customized workspace back to the default workspace, or to the group workspace that is set by your case administrator.
To reset a workspace:
On any page in the case, click the user name menu, and then point to User settings.
Do one of the following:
To reset to the group workspace, select Reset to group default.
To reset to the case default workspace, select Reset to case default.
Click OK to confirm.
Set a group workspace
Case administrators can set a default workspace for a user group. When users access the Documents page, the group workspace appears instead of the case default workspace.
To set a group workspace:
On the Documents page, customize the workspace, as needed.
On the navigation bar, click your user name, point to User settings, and then click Set for groups.
Select the user group for the workspace, and then click Save.
For more information about managing groups and their members, see Create and manage groups.
Work with workspace panes
A workspace can include one or many panes, depending on the configuration. For information about how to configure a workspace, see Customize the workspace.
You can perform different tasks in each pane, as follows:
Use the Audio pane to transcribe audio documents.
Use the Browse pane to perform a variety of tasks. For example, you can browse for a new document set, select and filter documents within the current results set, find document coding or coding hits, or browse levels or issues.
Use the Code pane or the Conditional Coding pane to code documents. You can add up to two Conditional Coding panes to a single workspace. This allows you to view a standard template in one pane and your custom coding template in the other. When two Conditional Coding panes are included in a workspace, coding changes are synchronized between them.
Use the Coding History pane to view and audit history of coding changes.
Use the Compare pane to view differences between the text of two documents.
Use the List pane to see information about each document, along with coding and document details.
Use the Map pane to see a visualization of documents that are clustered based on the similarity of concepts.
Use the Memo Editor pane to create and edit memos, create and remove links, and download memos in a Hypertext Markup Language (HTML) format. The Memo Editor works with documents and entities.
Use the Related pane to see a list of documents that are related to each other based on threaded relationships, source and attachment relationships, or similarity of concepts.
Use the Timeline pane to review the distribution of documents over time.
Use the Translate pane to submit documents for machine language translation using a Google or Microsoft service.
Use the View pane to view a document's text content, native files, and image files.
Use the social network analytics panes (Domain Network, Communication Network, and Concept Cloud) to view the communication patterns between people and organizations. In the Communication Network pane, you can also view the communication patterns between people and identities.
All workspace panes include a menu. The options that are available on the workspace pane menus vary. All workspace pane menus include the following options:
Tip: With the exception of the workspace pane list, you can pin the other menu options to the toolbar of the pane.
Workspace pane list: Use this list to change the current pane. For more information, see Change a workspace pane.
Refresh: Select this option to refresh a pane.
Collapse: Select this option to collapse a pane
Maximize: Select this option to maximize a pane. The application maximizes the pane and hides all other panes in the workspace configuration. To restore hidden panes, on the toolbar of the pane, click Restore all hidden panes.
Close: Select this option to close a pane. When you close a pane, the application removes the pane from the current workspace as well as from the pre-set workspace configurations. To add the pane that you closed back to a workspace, edit the workspace. For more information, see Edit a workspace.
Change a workspace pane
To change a workspace pane from within a pane:
Note: You can also change the configuration of the workspace using the Workspaces menu on the main toolbar on the Documents page. For more information, see Customize the workspace.
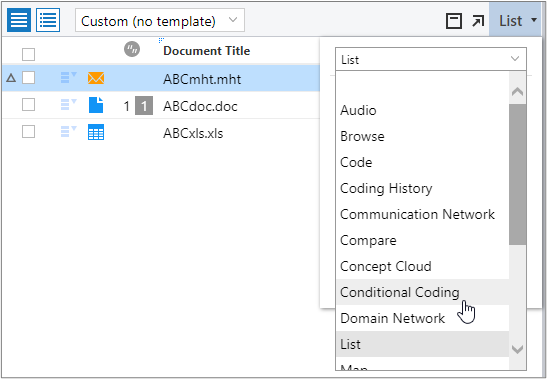
On the Documents page, in a pane, click the arrow next to the workspace pane menu.
In the list at the top of the menu, select a different pane.
Note: Changing a pane changes your workspace configuration.
The pane that you selected appears. If you select a pane that is already included in your current workspace configuration, the current pane is exchanged with the pane you select. For example, if your workspace configuration includes a Browse pane, a List pane, and a Conditional Coding pane, if you change the List pane to a Conditional Coding pane, the List pane appears where the Conditional Coding pane used to be.